Full volume generation
Instead of creating only a shallow relief, the image to STL generator can infer thickness and backside form so the object reads as a complete printable model.
Convert a JPG or PNG into a 3D printable STL file with an image to STL workflow built for makers, designers, educators, and hobbyists who want a clear path from flat artwork to a downloadable mesh.
The interactive app loads in modern browsers and lets you upload an image, describe optional edits, choose a fast or HD generation mode, preview the STL in WebGL, and download the result for slicer testing. This static page explains the same image to STL process for search engines and visitors who review the page before launching the generator.
Start generating for free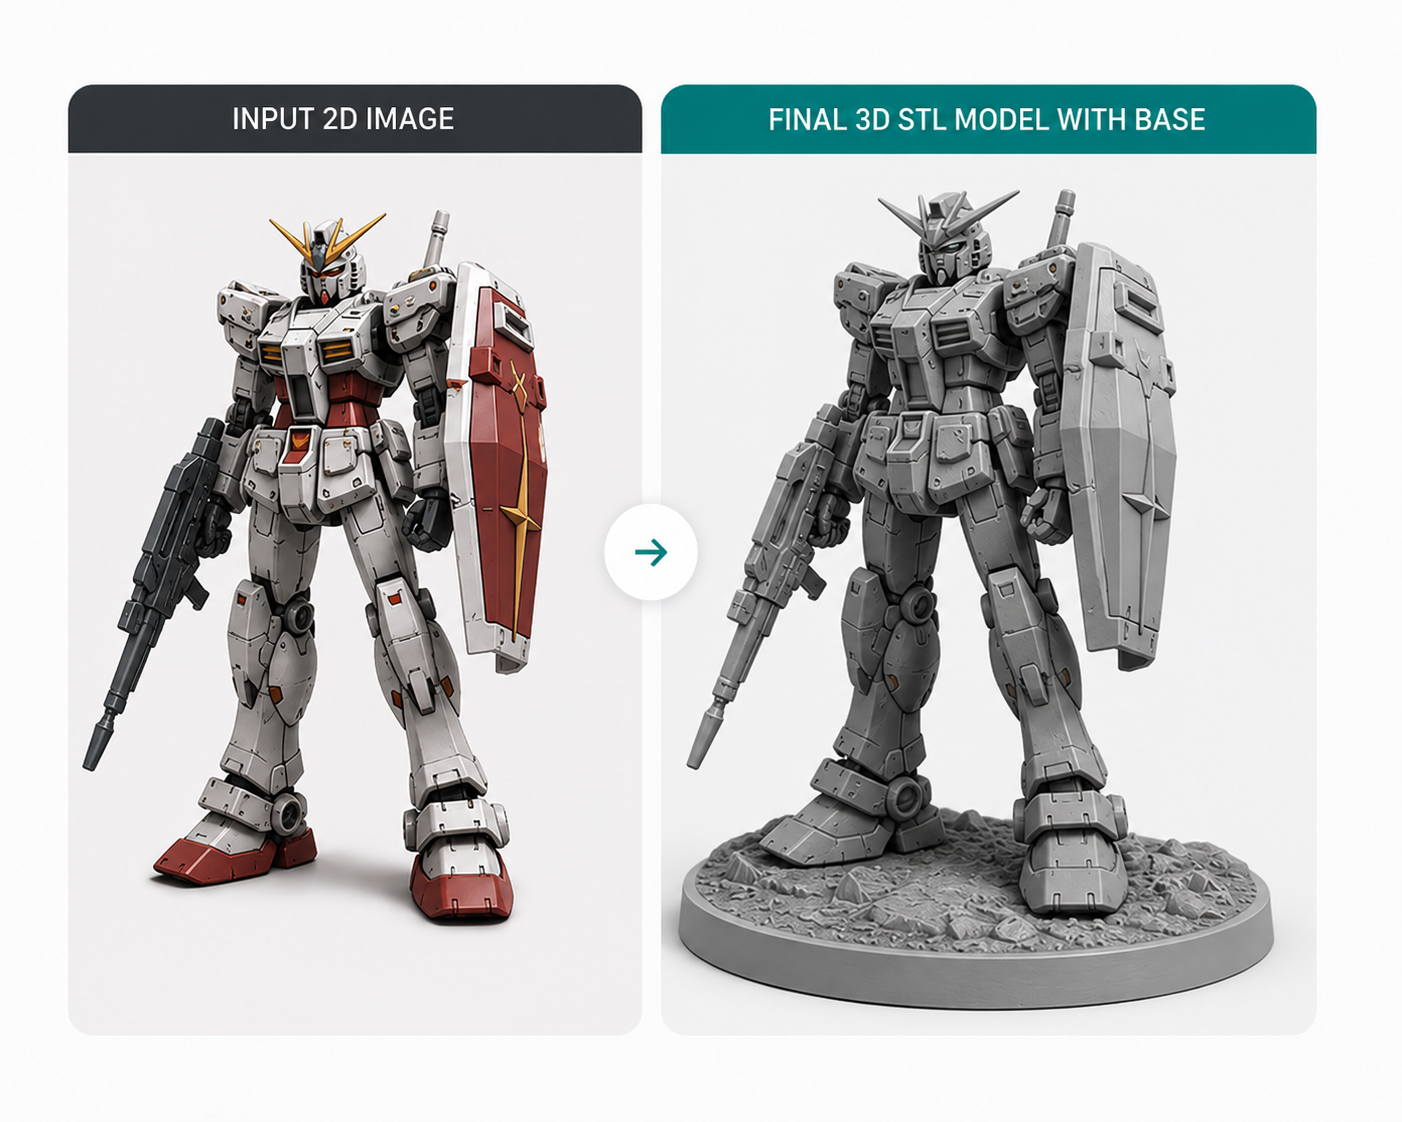
A good image to STL converter has to do more than emboss pixels onto a thin surface. 3D printing needs volume, a stable footprint, and geometry that a slicer can understand. This generator is designed around that practical goal. It studies the uploaded picture, interprets the main subject, builds depth, suggests a plausible backside, and produces a mesh that can be inspected before download. The result is useful for signs, ornaments, figurines, tabletop pieces, school projects, prototype decorations, and product mockups where a quick visual model matters more than hand modeling every vertex.
The tool supports common image inputs such as PNG and JPG files up to 5MB. Simple silhouettes, icons, logos, high contrast product photos, characters on clean backgrounds, and front-facing object photos usually create the clearest STL output. If the original artwork contains tiny text, heavy blur, busy shadows, or several overlapping subjects, the generated model may need a shorter prompt or a cleaner crop. You can still experiment quickly because the Fast Track mode is meant for early previews before you spend time on a higher detail version.
Instead of creating only a shallow relief, the image to STL generator can infer thickness and backside form so the object reads as a complete printable model.
A flat base and balanced orientation help the generated STL sit correctly in a slicer, reducing setup friction before the first print attempt.
After conversion, the WebGL preview lets you rotate the mesh, check the silhouette, and decide whether to download or run another generation.
Start with a clear image. Crop away unrelated background, make sure the subject fills the frame, and choose a version where edges are readable. Upload the image in the workstation, then add a short modification note if you want a cylinder base, extra thickness, a smoother back, a longer handle, a rounded border, or a stronger display stand. The prompt should describe physical changes rather than vague style wishes. For example, "add a flat circular base and make the character 40mm tall" gives the generator more actionable direction than "make it nice."
Choose Fast Track when you are testing composition, scale, and whether the image is a good candidate. Choose HD Track when the subject is already selected and you want more detail in the STL mesh. Once the job completes, rotate the model in the preview and look at the base, thin protrusions, holes, and backside. Download the STL file only after the preview matches the direction you want, then open it in your slicer to inspect wall behavior, support needs, and final dimensions.
This image to STL workflow is especially useful when you want a fast bridge between 2D source material and physical output. A teacher can turn a classroom mascot into a small printable token. A maker can convert a badge sketch into a raised emblem. A tabletop designer can test a creature silhouette before rebuilding the final sculpt. A shop owner can create a quick display model from a product photo. The generator is not a replacement for engineering CAD, but it is a quick creative step when the source begins as an image.
Use images with strong subject separation. The generator needs to understand which pixels belong to the object and which pixels are background. A logo on a plain field, a centered illustration, or a well-lit product photo generally works better than a crowded scene. If the source is a photo, try to remove strong shadows and reflections before upload. If the source is artwork, export it at a reasonable resolution so curves and corners remain crisp.
Think about print scale before generation. Thin whiskers, narrow antennae, small text strokes, and fragile decorative lines may look attractive on screen but fail at a small physical size. If the STL will be printed on an FDM printer, favor thicker shapes and simpler bases. If it will be printed on a resin printer, finer surface detail may survive, but supports and cleaning still matter. The best image to STL conversion is one that respects both the picture and the printer.
Review every generated STL in a slicer before printing. The browser preview is convenient for visual inspection, but slicers reveal practical issues such as unsupported overhangs, scale errors, accidental thin walls, and surface artifacts. A good workflow is to generate, preview, download, slice, inspect layer paths, and only then start the print. If the model needs another pass, adjust the prompt with a concrete instruction such as "make the base wider," "smooth the rear side," or "remove small floating details."
Keep file handling simple. The app is built for temporary conversion jobs, so treat the STL download as the file you keep and archive locally. Rename useful outputs with the subject, mode, and date, then store the matching source image beside the STL so you can reproduce or revise the result later. This small habit makes image to STL experiments easier to compare, especially when you are testing different crops, prompts, and print scales.
Picture to STL conversion is helpful for creative work that starts outside traditional CAD software. Artists can turn flat character art into a rough collectible. Parents can turn a child drawing into a keepsake. Cosplay builders can test emblem shapes before remodeling them by hand. Small businesses can create promotional desk objects from simple marks. Educators can demonstrate how 2D information becomes 3D geometry, then compare the generated mesh with a manually designed object.
The workflow also supports rapid iteration. When a first output is too thin, use a prompt that requests stronger depth. When the subject leans, ask for a flatter bottom or a wider base. When details are too soft, try HD Track or upload a cleaner crop. Because the generator is web based, the feedback loop is short: image in, STL preview out, then another revision if needed. That speed is the main value of an image to STL generator for nontechnical users and experienced makers alike.
An image to STL generator converts a 2D image into a 3D mesh file saved in STL format. The STL can then be opened in common slicer software for inspection, scaling, support planning, and 3D printing.
Yes. The app provides a free image to STL workflow for PNG and JPG uploads. You can generate a model, preview the geometry in the browser, and download the STL output when the result is ready.
No automatic converter can guarantee perfect printability for every image. The generator aims for printable geometry with a stable base, but you should still inspect the downloaded STL in your slicer before starting a real print.
Clean, centered subjects with clear edges work best. High contrast illustrations, logos, icons, toys, badges, and simple object photos usually convert more reliably than cluttered scenes or blurry images.
Write physical instructions. Useful prompts mention a base, thickness, smoothness, height, rounded edges, simplified detail, or the removal of fragile parts. Specific requests give the image to STL generator a clearer target.